For decades, taking a screenshot on a computer was a basic, binary action. You pressed a designated key, your operating system snapped a flat picture of your desktop, and you pasted that raw image into a separate application to save or edit it. It was a functional but entirely static workflow.
With modern updates to Windows 11, Microsoft has quietly transformed screen capturing from a simple utility into an advanced ecosystem powered by local artificial intelligence, automated cloud workflows, and dynamic media creation tools.
Many users are completely unaware that hidden just beneath the surface of the familiar Windows interface lies a suite of tools capable of executing optical character recognition (OCR), converting live screen recordings into animated GIFs, instantly redacting sensitive personal information, and using on-device neural processing to predict exactly what content you want to capture.
Whether you are an enterprise professional looking to streamline your documentation workflow, a student compiling research, or a casual user trying to share information quickly, this human-written master guide tears down the mechanics of the seven most powerful screenshot features hidden within Windows 11.
The Evolutionary Split: Classic Print Screen vs. Active Window Isolation
To truly understand how far screen capturing has come, we must look at the foundation of the technology. The traditional Print Screen (PrtScn) key is an piece of computing computing heritage. In older versions of Windows, tapping this key was a silent, unconfirmed action that required manual intervention to yield results.
In Windows 11, Microsoft has introduced a critical structural change to this classic workflow. By default, pressing the PrtScn key no longer simply copies a flat image to your clipboard; instead, it triggers the modern, interactive Snipping Tool interface.
The Mechanics of the Classic Clipboard Capture
If you prefer the old-school behavior—where an image is instantly copied to your system memory without launching an overlay—Windows 11 allows you to revert the settings.
Go to Settings > Accessibility > Keyboard and toggle off the setting that reads: “Use the Print screen key to open screen capture.”
               THE CLASSIC KEYBOARD CAPTURE CHOICE

  [ PrtScn ]       ──► Captures the entire desktop canvas to clipboard.

  [ Alt + PrtScn ] ──► Isolates only the active application window.
Once reverted, the system operates on a dual-pathway system:
-
The Full-Canvas Snapshot (PrtScn): This snaps every single pixel across your entire desktop real estate, including multi-monitor configurations, and stores it in your clipboard. You must then hit Ctrl + V to paste it into an image editor like Paint or Photoshop.
-
The Isolated Window Frame (Alt + PrtScn): This is one of the most effective hidden shortcuts for professional technical writers and support teams. Instead of capturing your cluttered desktop background, taskbar, or private browser tabs, holding down the Alt key while pressing PrtScn isolates only the specific application window that currently has focus.
The Rounded Corner Dilemma
Windows 11 features a modern design language defined by elegant, rounded window corners. When you utilize the Alt + PrtScn shortcut to isolate a specific window, image files are fundamentally required to be rectangular grid systems.
To resolve this geometric conflict, Windows 11 automatically extends the rounded corners out into squared-off, transparent or solid edges within the clipboard data. This ensures your window captures look neat and structured when dropped into external documentation.
Cloud-Driven Automation: Instantaneous Auto-Saving to OneDrive
One of the greatest inefficiencies in daily computer work is repetitive file management. Taking a screenshot, opening an image editor, pasting the capture, naming the file, and choosing a directory is a multi-step process that breaks your concentration, especially during live digital presentations or fast-paced webinars.
Windows 11 addresses this friction by letting you link the PrtScn key directly to Microsoft’s cloud infrastructure, turning a manual workflow into an automated one.
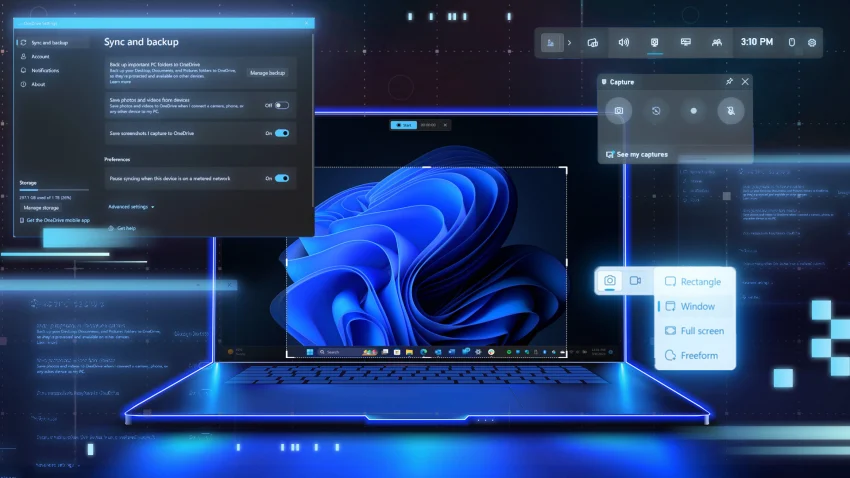
                  THE ONEDRIVE AUTOMATION LOOP

  [ Press PrtScn ] ──► Autogenerates Timestamped PNG ──► Uploads to Cloud Folder
                                                                │
                                                                ▼
                                                   [ Syncs Across All Devices ]
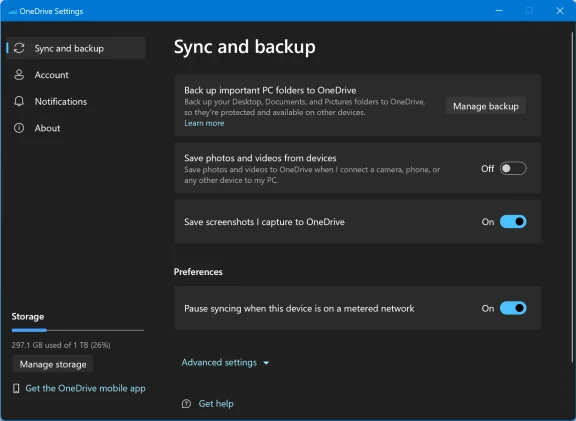
Activating the Cloud Engine
To activate this feature, click the OneDrive cloud icon located on the right side of your system taskbar. Select the gear icon to open Settings, navigate to the Backup tab, and check the box labeled: “Save Screenshots I capture to OneDrive.”
The moment this toggle is flipped, the operational mechanics of the PrtScn key change completely:
-
When you tap the key, your operating system bypasses the need for an external editor. It instantly compiles the data into a high-quality PNG image file.
-
The system applies a standardized naming convention using the exact current date and time (e.g., Screenshot_2026-06-02_203837.png).
-
The file is written directly into your cloud ecosystem at OneDrive/Pictures/Screenshots.
Multi-Device Accessibility
The second you capture an image using this method, a clickable desktop notification slides out from the bottom-right corner of your screen. Clicking this toast notification opens File Explorer with the newly created file already highlighted.
Because the file lives within your OneDrive directory, it is instantly synchronized across every device linked to your Microsoft account—including your smartphone, tablet, or even a Mac running the OneDrive client. This makes it incredibly easy to pull down a desktop capture onto your mobile device for messaging or social sharing without needing cables or manual transfers.
Local Hardware Storage: The Screen-Dimming Hard Drive Capture
There are many scenarios where relying on cloud synchronization is either impossible or undesirable. If you are working offline, handling highly confidential data that cannot be uploaded to external servers, or simply trying to preserve your cloud storage capacity, Windows 11 includes a parallel local automation shortcut.
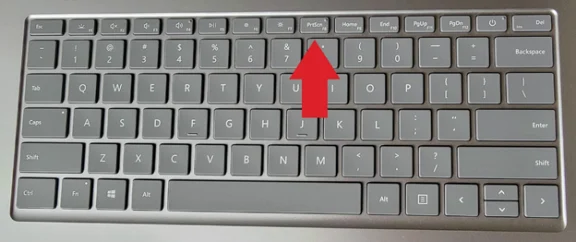
By pressing the Windows Key + PrtScn, you trigger a deep-level system command that records the screen directly to your physical storage drive.
                     LOCAL DRIVE STORAGE ROUTE

  [ Win + PrtScn ] ──► System Screen Dims ──► Saves Local PNG to \Pictures\Screenshots
Visual Confirmation and Storage Directories
When you execute the Windows Key + PrtScn combination, the entire display briefly dims for a fraction of a second. This visual flash mimics a physical camera shutter, providing immediate, clear confirmation that your capture was successful.
Behind the scenes, the operating system bypasses both the clipboard and cloud sync layers, writing a raw PNG file directly into your local machine’s profile at This PC > Pictures > Screenshots.
As a helpful bonus, Windows 11 still holds a copy of that image inside your system memory clipboard simultaneously. This allows you to immediately paste the image into an ongoing chat or email thread while maintaining peace of mind that a permanent copy is safely backed up on your hard drive.
The Snipping Tool Canvas: Precision Geometry and Color Correction
For precision work where you only want to capture a specific section of your screen, the native Snipping Tool is the gold standard. While you can launch the application manually via the Start menu, the fastest way to call it to action is through the classic keyboard shortcut: Windows Key + Shift + S.
                     THE FOUR SNIPPING VECTOR MODES

  [ 1. Rectangular ] ──► Click and drag a traditional four-sided selection box.
  [ 2. Freeform ]    ──► Draw any irregular shape with your mouse or stylus.
  [ 3. Window ]      ──► Left-click a single application frame to isolate it.
  [ 4. Fullscreen ]  ──► Snaps the entire digital canvas with a single click.
Mastering the Delay Timer for Fleeting UI Elements
Have you ever tried to take a screenshot of a hover-activated tool-tip, a expanding right-click context menu, or an animation that only appears for a split second? Using a traditional screenshot shortcut often forces these finicky user interface elements to instantly collapse.
To capture these elusive moments, type “Snipping Tool” into the Windows Start menu to open the full application window instead of using the quick shortcut.
On the toolbar, locate the clock icon. This drop-down menu allows you to inject a precise 3, 5, or 10-second delay before the screen freezes. This buffer gives you plenty of time to click into your application, expand the dropdown menu, and hold the exact screen state you want to capture.
The HDR Color Correction Engine
As high-end monitors with High Dynamic Range (HDR) become standard, they introduce a distinct problem to screen capturing. HDR displays utilize expansive color spaces and blinding luminance levels that standard dynamic range (SDR) monitors simply cannot process. If you take a standard screenshot on an HDR monitor and send it to someone using an older SDR screen, the image often looks washed out, gray, or over-saturated.
Windows 11 solves this problem by adding an HDR screenshot color correction toggle inside the Snipping Tool’s settings menu (accessible via the three-dot menu at the top right). When activated, the tool runs an automated tone-mapping algorithm over your capture, compressing the expansive HDR brightness range into an accurate, vibrant color palette that looks spectacular on any display.
Moving Images: Built-In Screen Recording and Instant Animated GIFs
For years, if you wanted to record a quick video of your screen to show a colleague a software bug or demonstrate a workflow, you had to download third-party tools or load up heavy, complex software like OBS Studio. In Windows 11, the Snipping Tool has expanded into a fast, lightweight screen recording studio.
How to Record Screen Video with Internal Audio
By pressing Windows Key + Shift + S and clicking the movie camera icon on the toolbar, the tool switches from image capture to video mode.
                    THE VIDEO CAPTURE SEQUENCE

  [ Select Area ] ──► [ Click Start ] ──► [ 3-2-1 Countdown ] ──► [ Perform Action ]
Use the crosshairs cursor to draw a boundary around the exact portion of the screen you want to capture. Click the Start button, watch the 3-2-1 countdown clear, and begin your demonstration.
The recording engine doesn’t just capture video; it also records any internal audio playing from your PC, along with microphone inputs if you need to narrate your actions. When you are finished, press Stop to load the video preview window.
The One-Click GIF Conversion Engine
Videos are incredibly helpful, but sharing raw video files over email or team chats can be frustrating due to large file sizes and auto-play compatibility issues. For short, repetitive loops, an animated GIF is far more effective.
Once your video recording is sitting inside the Snipping Tool preview window, look closely at the upper toolbar. Alongside the standard save icons, you will find an animated GIF button. Clicking this icon prompts Windows to automatically compress, re-index, and convert your captured video frames into a lightweight, highly shareable .gif file with a single click.
If your clip is slightly too long, you can use the built-in Trim button next to it to cut out unwanted frames before exporting.
AI-Powered Text Actions: Advanced Optical Character Recognition (OCR) and Smart Redaction
The most impressive technological leap in Windows 11’s screenshot toolset is its deep integration of Optical Character Recognition (OCR). A screenshot is no longer just a collection of static pixels; the operating system treats it as a rich, searchable data layer.
By clicking the Text Actions icon (a page symbol with horizontal lines) on the Snipping Tool toolbar, the software uses local machine learning to scan the image for text characters.
                           TEXT ACTIONS MENU

  [ Copy All Text ]   ──► Extracts all scanned words directly into your clipboard.

  [ Quick Redact ]    ──► Automatically searches and blacks out private data strings.
Extracting Text from Uncopyable Mediums
We have all run into websites that block right-click text copying, text locked inside streaming video frames, or scanned PDF documents that behave like flat images.
With Text Actions active, you can simply take a quick screenshot of the problem area, click the text tool, and highlight the words directly within your image to copy them into your clipboard. This completely eliminates the need to manually re-type long data strings or code blocks.
Protecting Your Privacy with Smart Redaction
Sharing screenshots often introduces the accidental risk of exposing private customer data, proprietary corporate info, or personal details. Manually painting over text with a black marker tool is tedious and easy to mess up.
The Snipping Tool solves this with its automated Quick Redact system. When clicked, the tool scans the text for specific data patterns matching email addresses, phone numbers, and full names.
It instantly covers these sensitive fields with perfect black redaction bars, allowing you to share your technical screenshots across public channels without compromising anyone’s privacy.
Next-Generation Upgrades: Copilot+ AI Frameworks and “Click To Do”
For users running Windows 11 on the latest generation of Copilot+ PCs—which feature dedicated, high-performance Neural Processing Units (NPUs) directly on the silicon—the screen capture workflow enters the realm of predictive artificial intelligence.
                    COPILOT+ NPU ACCELERATION HUB

  [ Perfect Screenshot ] ──► Predictive boundary mapping using on-device AI.

  [ Click To Do ]        ──► Launches contextual screen analysis engine.
Automated Boundaries with Perfect Screenshot
On an NPU-equipped machine, the Snipping Tool gains a smart toggle called Perfect Screenshot. Instead of requiring you to meticulously line up your cursor with the exact edges of a chart, photo, or block of text, the on-device AI instantly analyzes the visual layout of your display.
The moment you click near a visual element, the tool cleanly snaps its capture boundaries around that object automatically, saving you from sloppy crops or uneven margins.
Contextual Computing with “Click To Do”
The ultimate expression of Windows 11’s modern AI strategy is the Click To Do button. This feature acts as an intelligent, context-aware bridge between your screen capture and your entire OS.
When you activate Click To Do on a screenshot, the system reads the actual content of the image to figure out what you are trying to achieve and suggests immediate smart actions:
-
If the screenshot contains a foreign language, it offers to translate it on the spot.
-
If it contains an image of a specific commercial product, it can launch a visual web search.
-
If it details a project workflow, it can pass that data directly to an AI assistant to summarize or draft a follow-up email.
Comprehensive Feature Matrix for Windows 11 Captures
To help you choose the best tool for your current task, use this quick reference comparison matrix:
| Feature / Tool | Shortcut / Trigger | Primary Output | Best Used For | Hidden Superpower |
| Classic Print Screen | PrtScn | Clipboard Data | Legacy apps & basic sharing | Custom setting to bypass the Snipping Tool overlay |
| Active Window Snap | Alt + PrtScn | Clipboard Data | Clean software documentation | Automatically squares off modern rounded corners |
| OneDrive Cloud Sync | PrtScn (Configured) | Cloud-Hosted PNG | Multi-device workflows & live presentations | Instantly syncs captures to your phone via cloud folders |
| Local Automated Save | Win + PrtScn | Physical Local File | Offline security & bulk saving | Confirms success with a physical screen-dimming flash |
| Snipping Tool Hub | Win + Shift + S | Interactive Canvas | Precision layout cropping | Built-in clock timer captures finicky drop-down menus |
| Smart Video Studio | Movie Camera Mode | MP4 Video or GIF | Bug reporting & tutorials | Built-in Trim tool and one-click animated GIF export |
| Text Actions (AI) | Toolbar Page Icon | Raw Text Data | Extracting locked data | Quick Redact automatically hides private emails & phone numbers |
Streamlining Your Daily Workflow
The true power of Windows 11 doesn’t come from just using one of these tools; it comes from combining them to fit your daily routine. Stop wasting time manually cropping, pasting, and editing your captures.
If you need text out of an uncopyable image, use Text Actions. If you need to show someone how to use an app, skip the video file entirely and generate an instant GIF loop. If you are capturing a fast live stream, turn on OneDrive auto-saving and let the cloud handle file creation while you stay focused.
By mastering these seven hidden screenshot features, you can transform a basic utility into a highly effective tool that saves you time and effort every single day.
FAQ
1. How do I take a screenshot quickly in Windows 11?
Use the Windows + Shift + S keyboard shortcut to open the Snipping Tool and select the area you want to capture.
2. What is the difference between PrtScn and Alt + PrtScn?
PrtScn captures the entire screen, while Alt + PrtScn captures only the currently active window.
3. Where are screenshots saved when using Windows + PrtScn?
Screenshots are automatically saved in the Pictures > Screenshots folder on your PC.
4. Can Windows 11 automatically save screenshots to the cloud?
Yes. If OneDrive screenshot backup is enabled, screenshots can automatically sync to your OneDrive account.
5. What is Text Actions in the Snipping Tool?
Text Actions uses OCR technology to extract text from screenshots, allowing you to copy and edit text directly from images.
6. Can the Snipping Tool record my screen?
Yes. Recent versions of the Snipping Tool support screen recording and video capture.
7. What is Quick Redact in Windows 11?
Quick Redact automatically detects and hides sensitive information such as email addresses, phone numbers, and personal details before sharing screenshots.
8. How can I capture menus or tooltips that disappear quickly?
Use the Snipping Tool delay timer feature, which offers 3, 5, or 10-second delays before capturing the screen.
9. Are AI screenshot features available on all Windows 11 PCs?
No. Features like Perfect Screenshot and Click To Do are currently limited to supported Copilot+ PCs.
10. Does Windows 11 support HDR screenshot color correction?
Yes. Windows 11 includes HDR screenshot correction options that help screenshots appear accurate on both HDR and SDR displays.

