When connecting your PC to a network—whether at home, school, or the office—your computer name plays an important role. It helps identify your device among others and makes sharing files or connecting to another computer much easier.
However, most PCs running Windows 10 come with a default name generated by the manufacturer. These names are often random combinations of letters and numbers, making them difficult to remember or recognize.
That’s why many users choose to rename their computers to something more personal and easy to identify.
In this guide, you’ll learn two simple and effective ways to change your computer name in Windows 10, along with helpful tips to avoid common mistakes.
Why Should You Change Your Computer Name?
Before jumping into the tutorial, let’s quickly understand why renaming your PC is useful:
- Makes your device easier to identify on a network
- Helps with file sharing and remote access
- Improves organization in multi-device environments
- Adds a personal touch to your computer
Important Things to Know Before Renaming
Before you proceed, keep these points in mind:
- You must have administrator privileges
- You will need to restart your computer for changes to apply
- Avoid using special characters or spaces in the name
- Keep the name short and meaningful
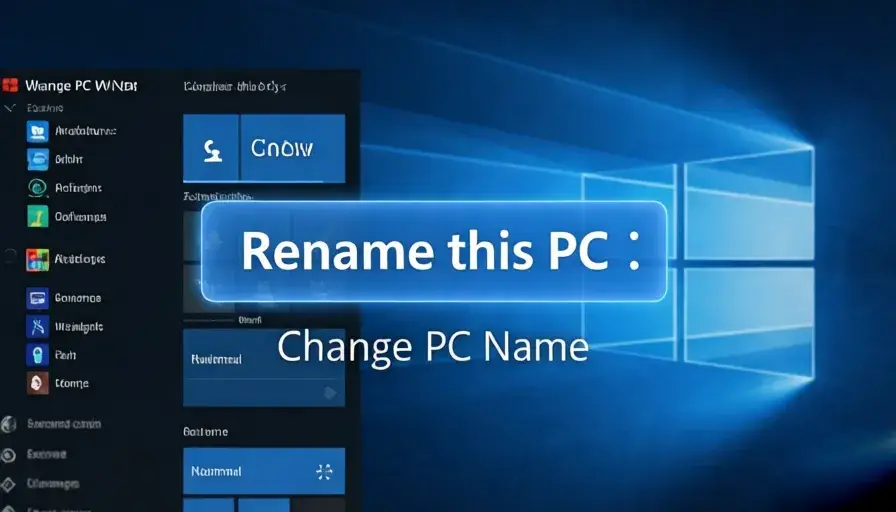
Method 1: Change Computer Name via Settings
This is the easiest and most beginner-friendly method.
Step-by-Step Instructions
- Click the Start Menu (Windows icon) in the bottom-left corner
- Select Settings (⚙️ icon)
- Click System
- Scroll down and choose About from the left sidebar
- Click Rename this PC
- Enter your desired computer name
- Click Next
- Choose Restart Now or Restart Later
Once your PC restarts, your new computer name will be applied.
Pro Tip
Choose a name that reflects:
- Your name (e.g., John-PC)
- Device type (e.g., Office-Laptop)
- Function (e.g., Design-Workstation)
Method 2: Change Computer Name via System Properties
This method is slightly more technical but equally effective.
Step-by-Step Instructions
- Open the Search bar
- Type: sysdm.cpl and press Enter
- Alternatively, press Windows + R and type sysdm.cpl
- The System Properties window will appear
- Click the Change… button
- Enter your new computer name in the Computer name field
- Click OK
- Confirm the prompt and restart your PC
Note
If you see the message:
“You must restart your PC to apply these changes”
That’s completely normal. The new name will only take effect after restarting.
Method Comparison
| Feature | Settings Method | System Properties Method |
|---|---|---|
| Difficulty | Easy | Medium |
| Speed | Fast | Fast |
| Best For | Beginners | Advanced users |
| Requires Restart | Yes | Yes |
Common Mistakes to Avoid
When renaming your PC, avoid these:
- Using spaces or special characters (e.g., @, #, !)
- Choosing names that are too long
- Forgetting to restart your PC
- Using duplicate names in the same network
Administrator Access Explained
To change system settings like your computer name, Windows 10 requires administrator privileges.
If you don’t have admin access:
- Contact your system administrator
- Log in with an admin account
When Do You Need a Computer Name?
Here are common scenarios where your computer name matters:
- Connecting to a local network
- Sharing files between devices
- Remote Desktop connections
- Office IT management systems
Tips for Choosing a Good Computer Name
A good computer name should be:
- Easy to remember
- Unique within your network
- Short and clear
- Relevant to the user or purpose
Examples:
- Alex-PC
- Office-Desktop-01
- GamingRig
- DesignStudio
How Computer Naming Works in Windows
In Windows 10, each device is assigned a unique identifier called a hostname.
This name is used by:
- Network systems
- Routers
- Other computers
Changing it does not affect your files—it only changes how your device is identified.
Do You Need to Restart?
Yes, restarting is required because:
- The system needs to apply the new name across services
- Network configurations must refresh
- Active sessions must reload
Without restarting, the old name will still appear.
Benefits After Renaming
After changing your computer name, you’ll notice:
- Easier device identification
- Better organization in networks
- Improved productivity in multi-device setups
Frequently Asked Questions (FAQ)
1. Can I change my computer name without restarting?
No. A restart is required for the changes to take effect.
2. Is it safe to rename my PC?
Yes, it is completely safe and does not affect your files or applications.
3. Can I use spaces in my computer name?
It’s not recommended. Use hyphens (-) instead.
4. What happens if two computers have the same name?
It may cause conflicts in a network environment.
5. How often can I change my computer name?
You can change it as often as you like.
Conclusion
Changing your computer name in Windows 10 is a simple yet useful task that improves how your device is identified—especially in network environments.
Whether you choose the Settings method or the System Properties method, both approaches are quick and easy to follow.
Just remember:
- Use a clear and unique name
- Restart your PC after making changes
Final Thoughts
Renaming your computer might seem like a small tweak, but it can make a big difference—especially if you regularly connect to networks or manage multiple devices.
Now that you know how to do it, why not give your PC a name that actually makes sense?


