The Windows Shell Namespace Architecture: A Comprehensive Guide to File Explorer Configuration and Directory Optimization
1 week ago
Operating system navigation relies heavily on the graphical user interface of the shell environment. In Microsoft Windows 10 and Windows 11, the subsystem responsible for managing files, directories, and peripheral namespaces is driven by explorer.exe. For system administrators, power users, and security analysts, configuring how this subsystem displays metadata, processes search queries, and treats hidden or system-level variables is managed through the File Explorer Options (historically designated as Folder Options) control panel applet.
Optimizing these settings alters how the underlying shell retrieves, caches, and renders file system entities. This analysis breaks down the access protocols for File Explorer Options, examines the technical mechanics of its three primary configurations tabs, maps GUI toggles to their respective Windows Registry keys, and provides troubleshooting steps for corrupted shell views.
Access Protocols for File Explorer Options
Accessing the File Explorer Options dialog box can be achieved through multiple vectors within the Windows subsystem. Each method leverages a different entry point into the Windows API or the shell environment.
                  [Shell Navigation Vectors]
                              │
       ┌──────────────────────┼──────────────────────┐
       ▼                      ▼                      ▼
[Graphical Shell]      [Subsystem Command]    [Legacy Management]
File Explorer Ribbon   Search / Run Prompt    Control Panel Applet
  (Ctrl+N -> Alt+V)    (control.exe folders)    (Small/Large Icons)
Protocol A: The Graphical Shell Interface (File Explorer)
The most common way to access these settings is directly through an active instance of the File Explorer window.
-
Initialize File Explorer by executing the keyboard shortcut Windows Key + E.
-
Navigate to the top horizontal toolbar menu.
-
On Windows 10: Click the View tab on the Ribbon interface, then select the Options interactive element located on the far right.
-
On Windows 11: Click the See more ellipsis icon (...) on the command bar, then select Options from the contextual drop-down menu.
-
-
Select Change folder and search options to initialize the targeting modal dialog box.
Protocol B: The Command Line and Subsystem Run Prompt
For automated execution, remote management, or environments where the graphical shell is partially unresponsive, the dialog box can be summoned directly via the Run dialog or command-line interfaces (cmd.exe or PowerShell).
-
Open the Run dialog interface by using the shortcut Windows Key + R.
-
Input the following explicit command string to execute the shell folder options management utility:
DOScontrol.exe folders
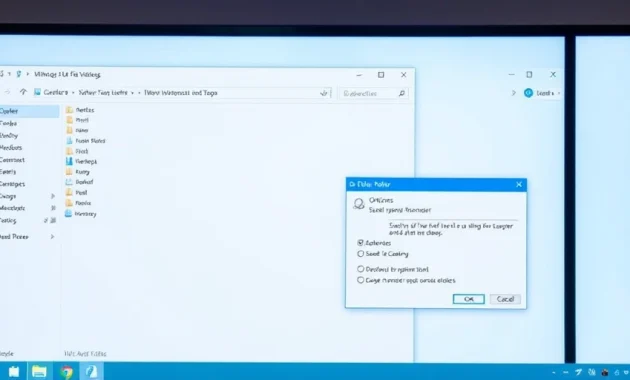
3.  Press `Enter` or click **OK**. This completely bypasses the File Explorer shell window and calls the specific Control Panel compilation library (`shell32.dll`) to render the options directly.

### Protocol C: The Legacy Management Infrastructure (Control Panel)
The unified administrative control hub handles the registration of hardware and software variables, including the configuration of folder behaviors.

1.  Invoke the Windows Search menu (`Windows Key + S`), input `Control Panel`, and launch the desktop application.
2.  Locate the **View by** configuration element in the upper right quadrant of the interface and transition the view state from *Category* to **Small icons** or **Large icons**.
3.  Scan the alphabetically sorted workspace and click on **File Explorer Options** to open the properties sheet.

---

## 2. Jars of Configuration: Deep Dive into the Three-Tab Architecture

The File Explorer Options user interface is organized into three specialized tabs: **General**, **View**, and **Search**. Each tab manages a distinct set of operational variables within the Windows file system shell.
[File Explorer Options Sheet]
├── Tab 1: General ──► Navigation Targets, Window Instancing, Privacy Cache
├── Tab 2: View ──► Advanced Attribute Rendering, Hidden Storage, Core File Visibilities
└── Tab 3: Search ──► Indexer Behavior, Content Parsing, Non-Indexed Searching
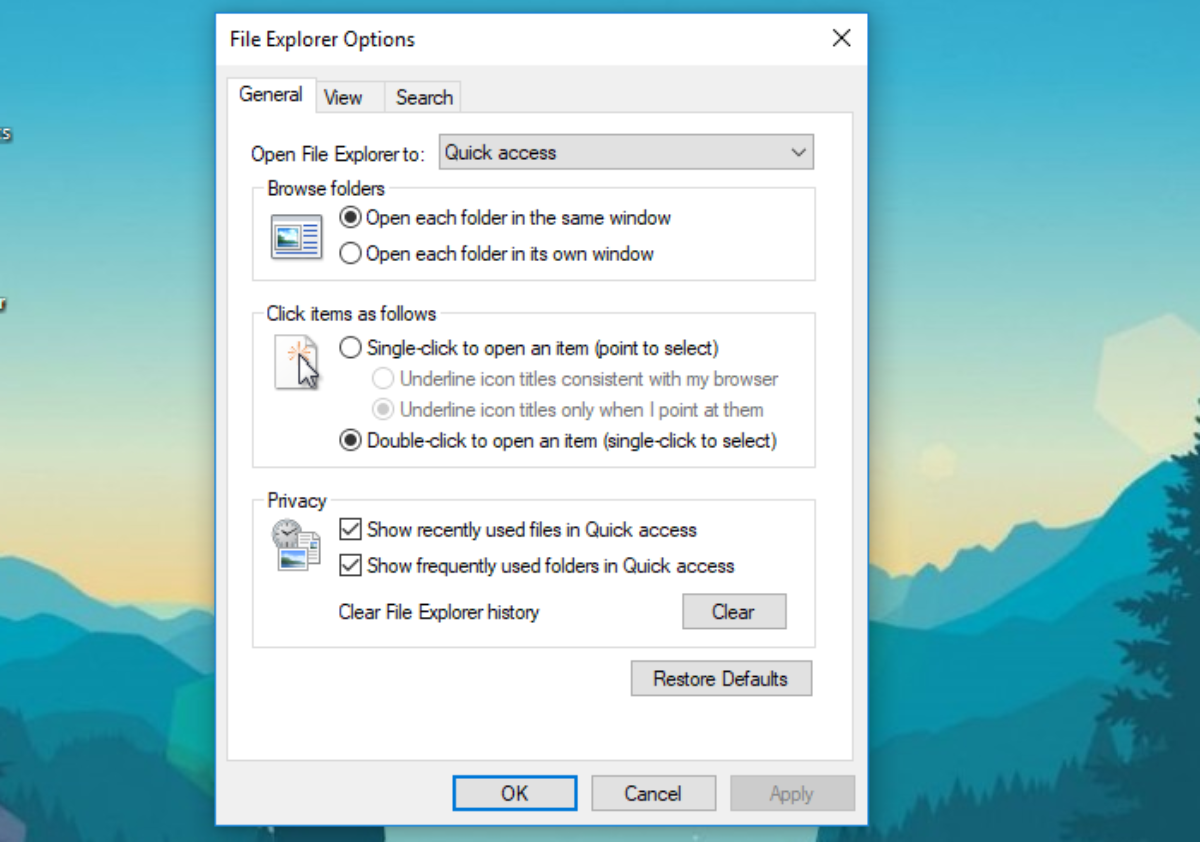
### Tab 1: General (Navigation and Privacy Controls)
The General tab governs how File Explorer behaves when launched and how it displays history.

*   **Open File Explorer to:** Offers a dropdown to set the default landing directory upon initialization. Users can choose between **Quick access** (or **Home** in Windows 11), which aggregates pinned and frequent assets, and **This PC**, which targets the root root directory of attached physical drives and mapped network shares.
*   **Browse folders:** Controls window instancing.
    *   *Open each folder in the same window:* Minimizes desktop clutter by reusing the active thread and window space for sub-folder navigation.
    *   *Open each folder in its own window:* Spawns a unique process thread for each directory opened, allowing for rapid side-by-side asset comparison but increasing memory overhead.
*   **Click items as follows:** Modifies input responses. Users can select a single-click interaction model with underline points reminiscent of a web browser, or the classic double-click execution model to prevent accidental item activation.
*   **Privacy Engine:** Manages tracking metrics. The checkboxes control whether the system logs frequently used folders and recently accessed files. The **Clear** button flushes the file explorer history cache, purging the underlying `Recent Items` database.

### Tab 2: View (Advanced Attribute and Visual Rendering)
The View tab is the most critical component for advanced configuration, malware investigation, and system forensics. It directly controls how attributes flag variables on files and folders.
                  [View Tab Core Configurations]
                                │
     ┌──────────────────────────┴──────────────────────────┐
     ▼                                                     ▼
[Hidden Files and Folders] [File System Safety Shields]
-
Don't show hidden assets - Hide extensions for known types
-
Show hidden files, folders, and drives - Hide protected operating system files
*   **Hidden files and folders:** Switches between ignoring or showing the `H` (Hidden) bit-attribute assigned to directories or files. Turning on **"Show hidden files, folders, and drives"** reveals internal directories like `AppData` and staging environments.
*   **Hide extensions for known file types:** Controls whether the OS renders the trailing extension string (e.g., `.exe`, `.lnk`, `.bat`). Disabling this option is a standard security precaution. It exposes attackers who attempt to camouflage malicious payloads using double-extension strategies (such as `invoice.pdf.exe`).
*   **Hide protected operating system files (Recommended):** Toggles the visibility of items marked with both System (`S`) and Hidden (`H`) attributes (such as `bootmgr`, `pagefile.sys`, and `ntuser.dat`). Unchecking this box triggers a warning prompt because these files are vital to system boot and kernel stability.
*   **Launch folder windows in a separate process:** When enabled, this option tells Windows to run new File Explorer instances under a separate `explorer.exe` process thread. If a single folder window crashes due to an unstable network share or unreadable disk sector, the broader desktop environment, taskbar, and start menu remain functional.

### Tab 3: Search (Query and Indexing Behavior)
The Search tab dictates how the native OS lookup mechanism parses queries when looking for specific items within directories.

*   **How Windows searches:** Controls whether the indexing engine uses pre-computed metadata logs to speed up lookups, or performs a live, byte-by-byte scan of the storage media.
*   **When searching non-indexed locations:** Tells the search system how to handle directories that haven't been indexed.
    *   Enabling **"Include system directories"** expands searches to include folder architectures like `C:\Windows` and `C:\ProgramFiles`.
    *   Enabling **"Include compressed files"** forces the system to decompress zip, rar, and cab archives on the fly to search their contents, which increases CPU utilization but ensures thorough lookups.
    *   **Always search file names and contents:** Forces a slow, deep scan of the actual data inside files rather than just searching titles. This is essential for auditing unindexed text documents or log files.

---

## 3. The Backend: Registry Mapping for Automation

Every checkbox and selection available inside the File Explorer Options user interface corresponds to a value inside the Windows Registry. For enterprise deployments, group policies, or headless server instances, these values can be modified directly using command-line query scripts.

The primary configuration paths are located under the User Hive:
`HKEY_CURRENT_USER\Software\Microsoft\Windows\CurrentVersion\Explorer\Advanced`

| GUI Option Description | Target Registry Value Name | Data Type | Value Configuration Data |
| :--- | :--- | :--- | :--- |
| **Hidden Files and Folders** | `Hidden` | `DWORD` | `1` = Show Hidden Assets / `2` = Do Not Show |
| **Hide Protected OS Files** | `ShowSuperHidden` | `DWORD` | `1` = Reveal System Files / `0` = Hide System Files |
| **Hide Extensions for Known Types**| `HideFileExt` | `DWORD` | `0` = Show All Extensions / `1` = Mask Extensions |
| **Launch Folders in Separate Process**| `SeparateProcess` | `DWORD` | `1` = Isolate Threads / `0` = Share Explorer Process |
| **Open Explorer Window To** | `LaunchTo` | `DWORD` | `1` = This PC / `2` = Quick Access (Home) |

To modify these values programmatically via administrative PowerShell, use the following syntax structure:

```powershell
Set-ItemProperty -Path "HKCU:\Software\Microsoft\Windows\CurrentVersion\Explorer\Advanced" -Name "HideFileExt" -Value 0
Running this command immediately updates the registry hive, instructing the shell to show all file extensions across the user profile without requiring a complete system reboot.
Diagnostic Troubleshooting & Reset Protocols
Over time, the File Explorer view cache can become corrupt. This manifests as missing sidebar items, incorrect item arrangements, broken thumbnail previews, or settings changes that fail to save across system reboots.
                    [Shell Recovery Sequence]
                                │
   [Step 1: Clear History] ──► Flushes the privacy cache database
                                │
   [Step 2: Reset Folders] ──► Restores standard directory layouts
                                │
   [Step 3: Wipe BagMRU]   ──► Erases corrupt layout registries
Step 1: Flashing the Visual Cache Database
If directories are rendering improperly or displaying incorrect view orientations:
-
Navigate to the General tab of File Explorer Options.
-
Go to the Privacy section and click the Clear button to purge the Quick Access tracking logs.
-
Switch to the View tab and click the Reset Folders button. This resets all customized view types (such as details, lists, and large icons) back to the factory defaults across the operating system.
Step 2: Clearing Corrupted Registry Shell Bags
If the graphical interface fails to resolve layout issues, the problem likely stems from corruption within the Shell Bags registry keys. Windows uses these keys to store your custom view settings, icon positions, and window sizes for every single folder.
To clear these layout records, open an elevated PowerShell prompt and run the following commands to delete the cached BagMRU nodes:
Remove-ItemProperty -Path "HKCU:\Software\Microsoft\Windows\Shell\BagMRU" -ErrorAction SilentlyContinue
Remove-ItemProperty -Path "HKCU:\Software\Microsoft\Windows\Shell\Bags" -ErrorAction SilentlyContinue
Stop-Process -Name explorer -Force
Note: The third command forces explorer.exe to close. The Windows kernel will automatically restart the shell process, rebuilding the deleted registry keys with clean parameters.
Technical Summary Matrix
| Tab Name | Main Focus Area | Essential Diagnostic Scenario | PowerShell Key Reference |
| General | User Navigation Framework | Fixing application load lags by changing the default landing page from Quick Access to This PC. | LaunchTo |
| View | File Attribute Filtering | Exposing malicious scripts disguised with double extensions during malware investigations. | HideFileExt / Hidden |
| Search | Content Processing | Auditing local systems for specific strings hidden within unindexed log files or program data. | FilterFilesWithUnknownExtensions |
FAQ
1) What are File Explorer Options in Windows?
File Explorer Options—formerly called Folder Options—are the configuration settings that control how File Explorer behaves in Windows 10 and Windows 11. These settings affect how files, folders, search results, hidden items, file extensions, and navigation behaviors are displayed. They are especially useful for users who want to customize the shell environment, expose hidden system content, improve search behavior, or troubleshoot File Explorer display issues.
2) What is the purpose of File Explorer Options?
The purpose of File Explorer Options is to give users direct control over how the Windows shell displays and handles file system objects. Through these settings, you can:
- Change whether File Explorer opens to Home/Quick Access or This PC
- Show or hide hidden files and protected operating system files
- Show or hide file extensions for known file types
- Modify search behavior in indexed and non-indexed locations
- Adjust privacy settings related to recent files and frequently used folders
- Reset or restore default folder views when Explorer behaves incorrectly
3) How do I open File Explorer Options in Windows 10 or Windows 11?
There are several common ways to open File Explorer Options:
Method 1: Through File Explorer
- Press Windows + E to open File Explorer
- In Windows 10, click the View tab, then select Options
- In Windows 11, click the three-dot menu (...) in the top command bar, then choose Options
Method 2: Using Run
- Press Windows + R
- Type control.exe folders
- Press Enter
Method 3: Through Control Panel
- Open Control Panel
- Change View by to Large icons or Small icons
- Click File Explorer Options
4) Is File Explorer Options the same as Folder Options?
Yes. File Explorer Options is the modern name for what older versions of Windows called Folder Options. The functionality is largely the same: it manages how the Windows shell displays files and folders, how it searches, and how it handles visibility and privacy settings.
5) What are the three tabs inside File Explorer Options?
File Explorer Options is divided into three main tabs:
- General – Controls startup behavior, folder browsing, click behavior, and privacy history
- View – Controls how files, folders, extensions, hidden items, and system files are displayed
- Search – Controls how File Explorer handles indexed and non-indexed searches, including file content searching
Each tab manages a different part of the Explorer shell experience.
6) What does the General tab do in File Explorer Options?
The General tab controls everyday File Explorer behavior, including:
- Open File Explorer to
Lets you choose whether File Explorer opens to Home/Quick Access or This PC - Browse folders
Lets you choose whether folders open in the same window or in separate windows - Click items as follows
Lets you choose single-click or double-click to open files and folders - Privacy settings
Controls whether Windows shows recently used files and frequently used folders in Quick Access/Home - Clear history
Lets you erase recent File Explorer history if you want a cleaner navigation panel or need troubleshooting
7) What does “Open File Explorer to” mean?
This setting determines the default page that appears whenever you open File Explorer.
- Home / Quick Access shows pinned folders, recent files, and frequently used locations
- This PC opens directly to drives, devices, and standard folders like Documents, Downloads, and Pictures
Users who prefer quick access to recent activity often choose Home/Quick Access, while users who want direct access to storage devices and system folders often choose This PC.
8) What happens if I choose “Open each folder in its own window”?
When this setting is enabled, every folder you open launches in a separate File Explorer window rather than reusing the current one. This can be useful for:
- Side-by-side file management
- Moving files between folders more easily
- Comparing directory contents
However, it can also increase desktop clutter and use more system resources if you open many folders at once.
9) What does the View tab control?
The View tab is where most advanced File Explorer display settings live. It controls:
- Hidden files and folders visibility
- Protected operating system file visibility
- File extension visibility
- Folder window process behavior
- Display preferences for certain file system objects
This is the tab most commonly used by power users, IT administrators, and anyone troubleshooting missing files or suspicious file names.
10) How do I show hidden files and folders in Windows?
To show hidden files and folders:
- Open File Explorer Options
- Go to the View tab
- Under Advanced settings, find Hidden files and folders
- Select Show hidden files, folders, and drives
- Click Apply, then OK
This reveals items that have the Hidden attribute, such as certain app folders and configuration directories like AppData.
11) What is the difference between hidden files and protected operating system files?
These are two different visibility layers:
- Hidden files and folders are standard items marked with the Hidden attribute
- Protected operating system files are more sensitive system-level files usually marked with both System and Hidden attributes
Examples of protected operating system files include files related to boot, user profiles, and system memory. Windows hides them by default because deleting or modifying them can damage the operating system.
12) Should I uncheck “Hide protected operating system files”?
Only if you know exactly what you are doing. This option reveals critical system files that Windows normally hides for safety. It can be useful for:
- Advanced troubleshooting
- Malware investigations
- Forensic analysis
- Verifying system-level files
For normal users, it is best to leave this option enabled because accidental modification of these files can break Windows or cause startup problems.
13) Why should I disable “Hide extensions for known file types”?
Disabling Hide extensions for known file types is one of the most useful security settings in Windows. When this option is turned off, Windows shows the full file name including extensions like:
- .exe
- .bat
- .zip
- .docx
This helps you spot suspicious files more easily. For example, a malicious file named invoice.pdf.exe may appear harmless if extensions are hidden, but the full name clearly shows it is an executable file rather than a PDF document.
14) How do I show file extensions in File Explorer?
To show file extensions:
- Open File Explorer Options
- Go to the View tab
- Find Hide extensions for known file types
- Uncheck that box
- Click Apply and OK
After that, Windows will display the full extension for common file types across File Explorer.
15) What does “Launch folder windows in a separate process” do?
This setting makes File Explorer open folder windows in a separate explorer.exe process instead of grouping everything into the same shell process. This can improve stability in certain situations.
Benefits may include:
- A crashing folder window is less likely to take down the entire shell
- Better isolation when working with unstable network shares or problematic storage devices
- Potentially easier troubleshooting of Explorer-related issues
The downside is slightly higher memory usage.
16) What is the Search tab used for in File Explorer Options?
The Search tab controls how File Explorer searches files and folders, especially in locations that are not fully indexed by Windows Search. It can affect:
- Whether file contents are searched
- Whether system directories are included
- Whether compressed files are searched
- How aggressively Explorer searches non-indexed locations
This tab is useful when normal File Explorer searches fail to find files you know exist.
17) What does “Always search file names and contents” do?
This setting tells File Explorer to search not only file names but also the contents inside files, even in non-indexed locations. It is useful when you need to find:
- Text inside log files
- Keywords inside configuration files
- Content inside documents stored outside indexed folders
The tradeoff is speed. Deep content searching can be much slower than standard indexed searching, especially on large drives.
18) Should I include system directories and compressed files in search?
It depends on your goal.
Enable these options if you are:
- Troubleshooting missing files
- Investigating scripts, logs, or malware artifacts
- Searching technical folders like C:\Windows or application directories
- Looking for content inside archives or compressed files
Leave them off if you want:
- Faster searches
- Simpler results
- Less CPU overhead during file searches
19) Can File Explorer Options be changed through the Windows Registry?
Yes. Many File Explorer Options settings are backed by Registry values under:
HKEY_CURRENT_USER\Software\Microsoft\Windows\CurrentVersion\Explorer\Advanced
This allows administrators and power users to automate changes using Registry edits, scripts, or PowerShell.
20) Which Registry keys are commonly linked to File Explorer Options?
Some of the most commonly used mappings include:
- Hidden
Controls hidden file visibility
1 = Show hidden files
2 = Do not show hidden files - ShowSuperHidden
Controls protected operating system file visibility
1 = Show protected system files
0 = Hide protected system files - HideFileExt
Controls whether file extensions are hidden
0 = Show file extensions
1 = Hide file extensions - SeparateProcess
Controls whether Explorer windows run in separate processes
1 = Separate process
0 = Shared Explorer process - LaunchTo
Controls whether File Explorer opens to This PC or Quick Access/Home
1 = This PC
2 = Quick Access/Home
21) Can I change File Explorer Options using PowerShell?
Yes. You can modify the related Registry values using PowerShell. For example, to show file extensions, you can change the HideFileExt value in the Explorer Advanced Registry path. This is useful for:
- Deploying standard settings across multiple user profiles
- Automating configuration changes
- Creating admin scripts for troubleshooting or security hardening
22) Why are my File Explorer settings not saving properly?
If File Explorer settings keep resetting or folder views behave strangely, the cause may be:
- Corrupted Explorer history
- Broken folder view cache
- Damaged shell bag records in the Registry
- Explorer process instability
- Third-party shell extensions interfering with Explorer
Symptoms can include:
- Folder layouts not staying in Details/List/Icon mode
- Sidebar or navigation pane behaving incorrectly
- Thumbnails not loading properly
- File Explorer not remembering view preferences
23) What does the “Clear” button in the General tab actually do?
The Clear button in the Privacy section removes File Explorer’s recent history, including recently accessed files and frequently used folders shown in Home/Quick Access. It does not delete your actual files—it only clears the navigation history and usage records shown by Explorer.
This can be useful if:
- You want more privacy
- Quick Access is showing cluttered or incorrect items
- You are troubleshooting Explorer history behavior
24) What does “Reset Folders” do in the View tab?
The Reset Folders button restores folder view templates back to Windows defaults. This means it can undo customized layouts such as:
- Column choices
- Sorting behavior
- Grouping
- Icon sizes
- View modes like Details, Tiles, or Large icons
If folders are displaying strangely or inconsistently, Reset Folders is often one of the first troubleshooting steps worth trying.
25) What are Shell Bags and why do they matter?
Shell Bags are Registry entries Windows uses to remember folder-specific display settings, including:
- Window size and position
- Sort order
- Icon layout
- Chosen folder template
- View mode preferences
If these records become corrupted, File Explorer can behave unpredictably. Clearing Shell Bags can help reset broken folder views and force Explorer to rebuild clean folder display settings.
26) When should I reset Shell Bags or File Explorer view caches?
You should consider resetting them if you experience:
- Folder views not saving
- Incorrect layouts repeatedly returning
- Missing thumbnails or broken display behavior
- Explorer showing inconsistent folder templates
- View settings failing to apply even after clicking Apply
This is more of an advanced troubleshooting step, especially if simpler fixes like clearing history or using Reset Folders do not work.
27) Is File Explorer Options useful for malware investigation?
Yes. In fact, the View tab is particularly valuable in security and forensic scenarios. Security-conscious users often enable:
- Show hidden files, folders, and drives
- Show file extensions
- Sometimes show protected operating system files when deeper investigation is needed
These settings make it easier to spot:
- Disguised executables
- Hidden startup files
- Suspicious scripts using double extensions
- Unexpected files in AppData, Temp, Startup, or system-adjacent directories
28) What are the safest File Explorer settings for everyday users?
For general use, a practical and safe setup is:
- Show file extensions → enabled
- Show hidden files → optional depending on comfort level
- Keep protected operating system files hidden → enabled
- Open File Explorer to This PC or Home based on preference
- Use double-click to open items if you want to avoid accidental opens
- Leave system search settings at default unless you need deeper file searches
This gives you more visibility without exposing critical system files unnecessarily.
29) What settings are useful for power users and IT administrators?
Power users often prefer:
- Show hidden files, folders, and drives
- Show file extensions
- Open File Explorer to This PC
- Launch folder windows in a separate process
- Use advanced search options for non-indexed locations
- Reset or clear Explorer history when Quick Access behaves incorrectly
These settings provide better visibility, better troubleshooting capability, and improved control over the shell environment.
30) Can File Explorer Options help improve performance?
In some cases, yes—indirectly. Examples include:
- Setting Explorer to open to This PC instead of Home if Quick Access is slow or corrupted
- Clearing Explorer history if recent items are causing lag
- Avoiding unnecessary deep content searches in non-indexed locations
- Running folder windows in separate processes when a specific Explorer window keeps crashing
It is not a major performance optimization tool, but it can reduce friction and improve stability in certain scenarios.

