7 Essential Settings to Change on Your New MacBook Neo in 2026 That Will Get It Up and Running in Record Time
2 weeks ago
You’ve just unboxed your shiny new MacBook Neo — Apple’s most affordable MacBook ever, starting at $599 with its A18 Pro chip, stunning 13-inch Liquid Retina display, all-day battery life, and vibrant colors like blush, indigo, silver, and citrus. It’s a fantastic entry point into the Mac ecosystem, whether you’re switching from Windows, a Chromebook, or upgrading from an older device.
But before you dive into browsing, streaming, or creating, take a few minutes to tweak some key settings. These adjustments will improve security, personalize the experience, boost productivity, extend battery life, and make your MacBook Neo truly feel like your Mac.
In this updated 2026 guide, we walk through the 7 most important settings to change right after setup. These tips work perfectly on the MacBook Neo running macOS Tahoe 26 and apply to most modern Macs. They’re quick, safe, and make a huge difference for both new and experienced users.
Let’s get your MacBook Neo optimized and ready for action!
Security is one of Apple’s biggest strengths, and the MacBook Neo benefits from the same robust protections as higher-end models.
- Enable Automatic Updates Go to System Settings > General > Software Update. Click the info (i) button next to Automatic Updates and turn on all toggles. This ensures you always have the latest security patches, bug fixes, and new features from macOS Tahoe 26.
- Set Up Touch ID (if available) Higher-spec MacBook Neo models include Touch ID. Navigate to System Settings > Touch ID & Password and click Add Fingerprint. Follow the on-screen prompts to register your finger. This makes unlocking, Apple Pay, and app purchases fast and secure.
- Use the Built-in Passwords App Even without Touch ID, use Apple’s free password manager. Open the Passwords app (in Applications via Finder). Set it up, then install the browser extension via Passwords > Get Browser Extension. It autofills passwords securely across Safari and other browsers.
- Enable FileVault For full-disk encryption, go to System Settings > Privacy & Security > FileVault and turn it on. This protects your files if the laptop is ever lost or stolen. Store your recovery key safely (it syncs via iCloud Keychain if enabled).
These steps take just minutes but provide strong protection from day one.
macOS gives you more freedom than iOS when installing apps.
- Go to System Settings > Privacy & Security. Scroll to the Security section and set “Allow applications from” to App Store & Known Developers. This balances security with flexibility.
Changing default apps is easy:
- For file types (e.g., JPG images): Right-click a file > Get Info > Open with > select app > Change All.
- Default web browser: System Settings > Desktop & Dock > Default web browser > choose your preferred browser (Safari, Chrome, etc.).
- Default email client: Open the Mail app > Mail > Settings > General > Default email reader.
These tweaks ensure your MacBook Neo opens files and links exactly how you want.
The Dock is central to macOS navigation.
- Drag icons to rearrange or add/remove apps.
- Hide the Dock automatically: System Settings > Desktop & Dock > toggle Automatically hide and show the Dock.
- Disable recent apps: Turn off Show suggested and recent apps in Dock to reduce clutter.
- Change minimize animation: Switch from Genie Effect to Scale Effect for a cleaner look.
A well-organized Dock speeds up daily tasks significantly.
Never lose important files. Connect an external drive, then go to System Settings > General > Time Machine > Add Backup Disk. Select your drive and follow the prompts. Time Machine will automatically back up your MacBook Neo whenever the drive is connected.
Section 5: Master the Trackpad Gestures (≈ 650 words)
The MacBook Neo’s trackpad is excellent even without Force Touch on base models.
- Go to System Settings > Trackpad > More Gestures and explore options like App Exposé.
- For easier dragging: System Settings > Accessibility > Pointer Control > Trackpad Options > enable Use trackpad for dragging and choose your preferred method (three-finger drag is popular).
Mastering gestures makes navigation feel fluid and intuitive.
The MacBook Neo already offers impressive battery life, but these tweaks help even more.
- System Settings > Battery: Enable Optimized Battery Charging.
- Slightly dim the display on battery.
- Use Low Power Mode when needed.
These small changes can add meaningful hours to your usage.
Make the beautiful Liquid Retina display even better:
- Enable Night Shift (System Settings > Displays > Night Shift) for warmer evening tones.
- Turn on Automatically adjust brightness for adaptive lighting.
Explore Control Center customization, new icon/widget styles in macOS Tahoe 26, and Apple Intelligence features once set up.
Spending 15–20 minutes on these 7 settings transforms your new MacBook Neo from a generic laptop into a personalized, secure, and efficient machine. You’ll enjoy better privacy, smoother workflows, longer battery life, and a display that’s easier on the eyes.
Enjoy your MacBook Neo — it’s an incredible value in 2026!
FAQ – Shure MVX2U Gen 2
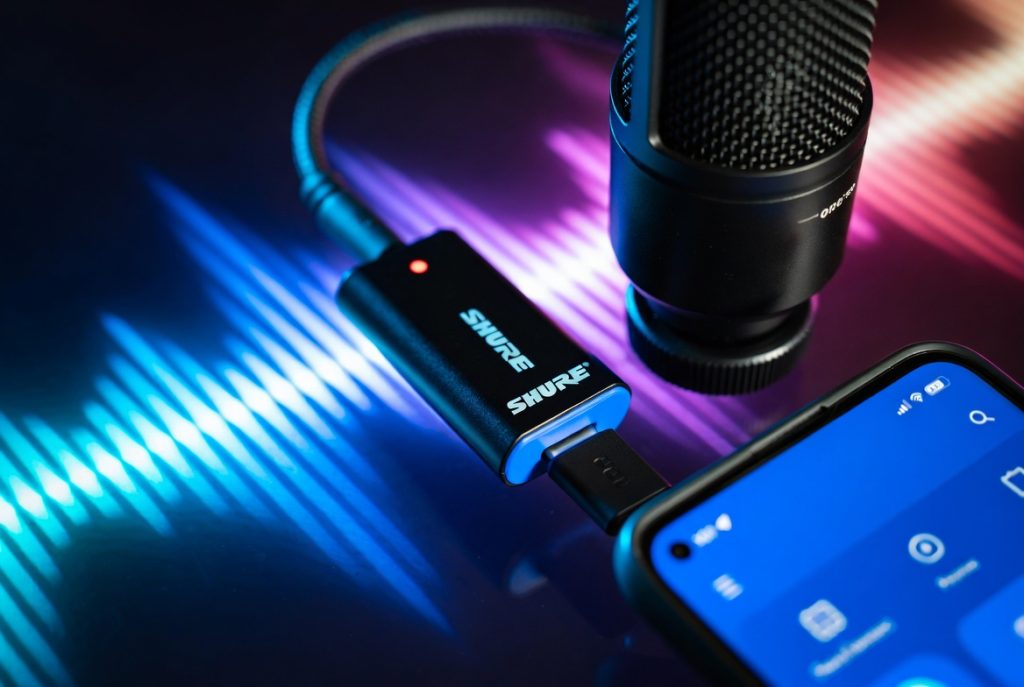
1. What is the Shure MVX2U Gen 2?
It is a compact USB-C adapter that allows professional XLR microphones to connect directly to smartphones, tablets, and computers. It supports 48V phantom power and offers audio control via the Shure Motiv app.
2. Which microphones are compatible?
All standard XLR microphones, including Shure SM7B, Neat King Bee II, and large-diaphragm condenser mics.
3. Does it work with iPhone and Android?
Yes. Tested with iPhone 17 Pro Max, Oppo Find X9 Pro, Samsung Galaxy S26, Google Pixel 10, and other USB-C devices.
4. Do I need additional software?
For full control (EQ, compression, presets), the Shure Motiv app is recommended. Auto mode is plug-and-play without the app.
5. Can I monitor audio in real-time?
Yes, it has a 3.5mm headphone jack for zero-latency monitoring.
6. Is it suitable for outdoor or mobile use?
Yes, its compact metal design is durable, ideal for mobile content, street interviews, and outdoor recording.
7. How much does it cost?
Approximately $120 / £140.
8. Key advantages:
- Portable and lightweight
- Automatic phantom power
- Professional audio without a bulky interface
- Supports iOS, Android, and PC
9. Limitations:
- Auto mode can sound slightly over-compressed
- App needed for advanced control
- Price may be high if you don’t already own an XLR mic
10. Who should buy it?
Vloggers, podcasters, mobile content creators, or anyone who wants pro-level audio with a smartphone.
Leave a Reply